導入
ドットゲームの中には、装備によってキャラクターの見た目が変わるものがあります。そのシステムを実装する際、全てのキャラクターの見た目を作っていたらキリがありません。
…もしスクリプトでドット絵を作ることができたら、その膨大とも思える作業量やメモリをコンパクトにできるでしょう。というわけで今回は、スクリプトのみでドット絵を表示させる方法を解説します。
例
こんな感じで、コードからドットの画像を作ることができます。(完全ランダムにも関わらず、既視感のある画像が何度も生成されているのは、Unityの疑似乱数の性質によるものです)
コード
以下のコードは、動画で使われているコードの内、無駄な部分を全て省いたバージョンです。なので、RawImageをアタッチして、変数riに「RawImageがアタッチされたゲームオブジェクト自身」をアタッチすれば、そのまま使えます。
using System.Collections;
using System.Collections.Generic;
using UnityEngine;
using UnityEngine.UI;
public class BrogIntroduce : MonoBehaviour
{
public RawImage ri;
void Start()
{
ri = GetComponent<RawImage>();
SetMarioTexture();
}
void Update()
{
}
// ーーーーーーーーーーーーーーーーーーーー
// 関数一覧
// ーーーーーーーーーーーーーーーーーーーー
public string[,] CreateMarioPicture()
{
string BBB_ = "#000f";
string rrr_ = "#f00f";
string _e_e = "#ff0f";
string x___ = "#0000";
string[,] picture_str = new string[,]
{
{x___,x___,x___,rrr_,rrr_,rrr_,rrr_,rrr_,x___,x___,x___,x___},
{x___,x___,rrr_,rrr_,rrr_,rrr_,rrr_,rrr_,rrr_,rrr_,rrr_,x___},
{x___,x___,BBB_,BBB_,BBB_,_e_e,_e_e,BBB_,_e_e,x___,x___,x___},
{x___,BBB_,_e_e,BBB_,_e_e,_e_e,_e_e,BBB_,_e_e,_e_e,_e_e,x___},
{x___,BBB_,_e_e,BBB_,BBB_,_e_e,_e_e,_e_e,BBB_,_e_e,_e_e,_e_e},
{x___,BBB_,BBB_,_e_e,_e_e,_e_e,_e_e,BBB_,BBB_,BBB_,BBB_,x___},
{x___,x___,x___,_e_e,_e_e,_e_e,_e_e,_e_e,_e_e,_e_e,x___,x___},
{x___,x___,BBB_,BBB_,rrr_,BBB_,BBB_,BBB_,x___,x___,x___,x___},
{x___,BBB_,BBB_,BBB_,rrr_,BBB_,BBB_,rrr_,BBB_,BBB_,BBB_,x___},
{BBB_,BBB_,BBB_,BBB_,rrr_,rrr_,rrr_,rrr_,BBB_,BBB_,BBB_,BBB_},
{_e_e,_e_e,BBB_,rrr_,_e_e,rrr_,rrr_,_e_e,rrr_,BBB_,_e_e,_e_e},
{_e_e,_e_e,_e_e,rrr_,rrr_,rrr_,rrr_,rrr_,rrr_,_e_e,_e_e,_e_e},
{_e_e,_e_e,rrr_,rrr_,rrr_,rrr_,rrr_,rrr_,rrr_,rrr_,_e_e,_e_e},
{x___,x___,rrr_,rrr_,rrr_,x___,x___,rrr_,rrr_,rrr_,_e_e,x___},
{x___,BBB_,BBB_,BBB_,x___,x___,x___,x___,BBB_,BBB_,BBB_,x___},
{BBB_,BBB_,BBB_,BBB_,x___,x___,x___,x___,BBB_,BBB_,BBB_,BBB_},
};
return picture_str;
}
public Texture2D ToTexture2D(string[,] picture_str)
{
Texture2D picture = new Texture2D(picture_str.GetLength(1),picture_str.GetLength(0));
for (int x = 0; x < picture_str.GetLength(1); x++)
{
for (int y = 0; y < picture_str.GetLength(0); y++)
{
string colorCode = picture_str[y,x];
Color color = default(Color);
if(ColorUtility.TryParseHtmlString(colorCode, out color))
{
picture.SetPixel(x, picture_str.GetLength(0)-1-y, color);
}
}
}
return picture;
}
public void SetTexture(Texture2D texture)
{
texture.filterMode = FilterMode.Point;
texture.Apply();
ri.texture = texture;
}
public void SetMarioTexture()
{
string[,] picture_str = CreateMarioPicture();
Texture2D picture = ToTexture2D(picture_str);
SetTexture(picture);
}
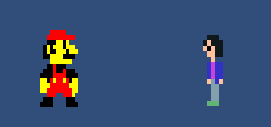
}↓ ちなみにコードの結果はこうなります(右はさっき居た奴です)
コードの説明
大筋
①マリオの絵をカラーコードで描く→②UnityEngine.Texture2Dに置き換える→③ゲームオブジェクトのRawImageのテクスチャを置き換える
①マリオの絵をカラーコードで描く
CreateMarioPictureの部分で担当。
BBB_とか_e_eとか変な名前が付いていますが、「遠くから見たらそれっぽく見える」以外に深い理由はありません。
②UnityEngine.Texture2Dに置き換える
ToTexture2Dの部分で担当。
GetLength(int i)は配列のi次元の要素数を取得する関数。
ColorUtility.TryParseHtmlString(string colorCode, Color outcolor)は、「colorCodeがUnityEngineColorに変換できるか」の判定をbool(真偽)を返し、trueの場合、outcolorに変換後の色を代入する関数。
SetPixel(int x, int y, Color color)は、Texture2Dの座標(x, y)のピクセルの色をcolorに変更する関数。Unityの座標はx座標が→方向、y座標が↑方向になっている一方、コード内のpicture_strはx座標が→方向、y座標が↓方向になっているので、y座標をpicture_str.GetLength(0)-1-yで置換しています。
③ゲームオブジェクトのRawImageのテクスチャを置き換える
SetTextureの部分で担当。
filterModeをPointに変更しているのは、ドットがぼやけないようにする為。
Apply() は最も重要 な関数。この関数は、Texture2Dの変更内容を適用する関数。これが無ければ、変更が適用されないので、灰色の画像が現れます。
補足
Textureの画像はピクセル数が増えても、大きさが変わらないので、大きさを不変にするか、大きさを変えるコードを作っておいた方が良いです。
また、作ったピクセルを動かしたい場合は、UIのRawImageではなく、ゲームオブジェクトにRawImageをアタッチして下さい。
Q&A
Q1. SpriteRendererのSprite.textureを使用せず、RawImage.textureを使用しているのは何故?
A1. SpriteRendererのSprite.textureは読み取り専用だからです。
Q2. ピクセルが表示されない。
A2. テクスチャを表示するにはキャンバスが必要なので、キャンバスの階層の下に移動させて下さい。